Story behind the catio:
I, the designer/builder of the catio, am a Girl Scout who was looking for a Gold Award project. I knew I wanted to do something to improve the lives of shelter animals. After touring “Look What the Cat Brought In” and talking with Jennifer Nosler, executive director of the Feline Rescue Network, I saw the need for a better environment for the more feral cats. These cats are used to being outdoors; then, for their health and safety, they are often captured and turned over to a rescue for care. Unfortunately, this usually means these cats are then confined to a relatively small indoor area. Jennifer and I agreed that we could make an outdoor living area–a “catio”–so the cats could choose to experience the elements as they desired.
You, too, can have a catio! Below are some design considerations, building materials that you would need, and construction details:
Catio Design Considerations:
Catio Design Considerations
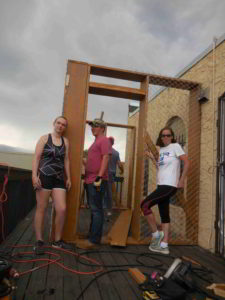
We chose to build the catio on an existing deck, covering a couple windows that could provide the cats access to both the indoors and the outdoors. Though the deck limited the maximum size of the catio, we felt the freedom of choice option (i.e., the cats can go in or out whenever they wanted) made this the most desirable location.
As is evident by the photo, I did have room to make the catio a bit larger; there are two reasons for the chosen size. For one, since the deck is not on ground level, I needed to leave a walk space to allow access to the catio on all sides for any needed repairs, etc. Secondly, I sized the catio to maximize use of standard size lumber to minimize costs.
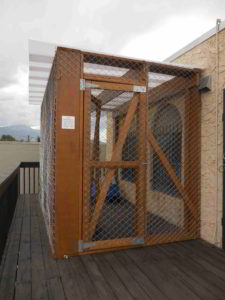
Because I placed the catio against a building, mine is only 3-sided. The long wall is approximately 12 feet while the sides are 6 feet. Though cats would have access via the windows, I still needed to provide door access for humans.
When we received the building permit from the Colorado Department of Agriculture, I received the requirement that the enclosure be a double-enclosure with a one-foot space between the walls.
Your catio may be different than mine. Yours may be bigger or smaller. You may place yours on a deck or on ground level. Yours may be against a building or it may not be. You can make a catio to fit your own space and needs!
If your catio will be different from mine, you will need different materials, of course. Below is the list of materials and tools I needed to build mine:
4 – 2x12x12 boards
16 – 2x12x8 boards
16 – 2x4x8 boards
8 – roof panels
3 – 4′ x 50′ rolls chain link fencing
1 – 1 lb box 3″ nails
1 – 1 lb box 2.5″ screws
2 – 1 lb box 1.25″ screws
3 – 1 lb box 1.25″ staples
1 – 1 lb box 3/4″ staples
1 – package of washers
10 – 3 x 7 tie plates
2 – gate hinge/latch/pull sets
2 – gallons weatherproofing stain
rollers for staining
Tools needed:
- Saws to cut wood–we used a mitre saw and a jig saw
- Nail gun
- Hammer for staples
- Metal cutter for chain link
- Tape measure
Materials notes:
- I chose to use standard pine for the lumber in order to keep costs lower. I learned that the quality of standard pine varies so went to two different stores in order to select the best boards–minimal warping or cracks.
- Because the structure will be exposed to weather, I protected the wood with a transparent weather-proofing stain (transparent is cheaper than the semi-transparent or solid color options).
- I chose white panels for the roof to minimize heat absorption while still allowing some light to filter through.


- Catio Construction How-To:
The instructions below give the general overview of how I built catio:
Board preparation
- Cut 4 2x12x8 boards down to 6′ to make top and bottom of the side walls. (note: save the 2′ boards–you’ll need them later for the door frame)
- With a jig saw, cut notches in 2 2x12x12 boards to enable the roof to slope. One board has a 3.5″ notch on either end; the other has a 2.5″ notch on either end.
- Stain all wood. We applied two coats to all sides. Let dry thoroughly.
Constructing the outside of the enclosure
- Build first side wall frame using 2 2x12x6 boards (2 of the 2x12x8 boards that were cut down to 6′) for the horizontal top and bottom and 3 2x12x8 lengths for the vertical supports. Attach boards using 3″ nails.
- For stability, we attached a 2x4x8 diagonally across the side wall by cutting notches into two of the 2x12x8 boards and one of the 2x12x6 boards to lock in the 2x4x8. It is critical to make sure the wall frame is straight before cutting notches. Once the 2x4x8 is locked in, the ends can be trimmed flush with the side walls. (note: the side on which the 2x4x8 is placed will be the outside)
- Cut two 8’3″ lengths of chain link. (note: the additional 3″ allows the chain link to be attached to the top and bottom boards). Attach the chain link using 1.25″ staples to what will be the outside of the enclosure.
- Build the long wall frame using 2 2x12x12 boards for the horizontal top and bottom and 6 2x12x8 lengths for the vertical supports. The vertical supports should be placed to create 5 sections: a 4′ section in the middle, 3′ sections on either side, and then 1′ sections on the ends which will match up with the side walls. Again, nail boards together using 3″ nails, attach 2x4x8 boards for stability, and attach chain link.
- Stand up the two completed sections and screw together using the 2.5″ screws.
- Create the final side wall very much like the first one. Only difference is that the 2x4x8 only goes thru the one section and chain link only covers one section; the other section will be for the doors.
- For stability on the door section, use 3 of the 4 to build a double horizontal support 3′ in length. Attach the support using 3″ nails so that their doorway is 7′ high.
- Attach this last section to the main wall using screws as before.
Constructing the roof
- The notched 2x12x12 boards will be used to support the roof. To support these boards, attach 2x4x8 boards to the wall frames on either end. (note: the 2x4x8 boards will need to be cut to fit. We did this on site to get the most exact fit.) The deepest notch board went along the building; the other notched board went down the middle.
- At this point, all wood is in place. Since this catio was built on a deck, we then screwed it down to the deck for added stability.
- Attach roof panels using 1.25″ screws and washers.
Constructing the interior & doors
- Attach chain link sections to the interior of the enclosure. We used the 3/4″ staples except where the chain link overlapped; in those cases, we needed the larger 1.25″ staples.
- Build two doors using 4 2x4x8 boards for each: 2 are for the vertical edges, 1 is cut into thirds to create horizontal beams, and the last is a supporting diagonal. Attach the door hinges and latch and then 5 tie plates per door for support as needed.
- Attach the doors to the doorway
- Add cat things and cats!